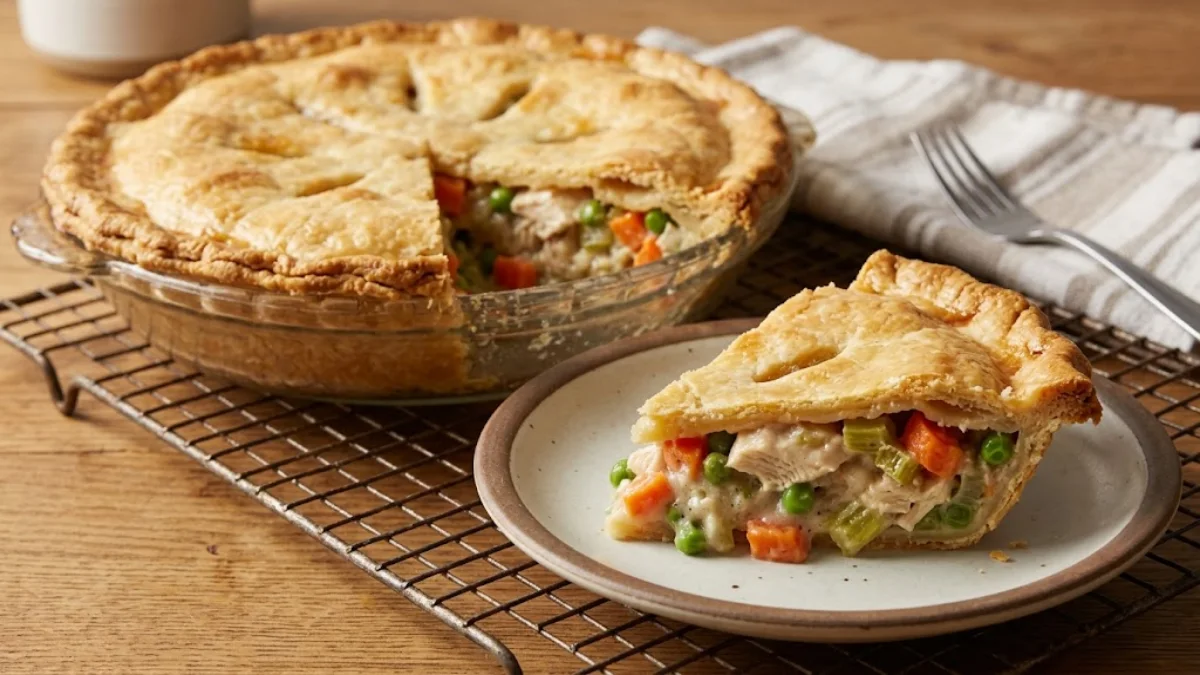
This homemade chicken pot pie features tender poached chicken breast, sweet carrots, celery, and peas enveloped in a rich, herb-infused chicken velouté, all baked inside a flaky, golden double crust. By cooking the vegetable and roux base on the stovetop before assembling, you ensure the filling is thick and fully cooked without overbaking the pastry. It delivers classic comfort food appeal with balanced texture, savory depth, and dependable structural stability.
Recipe Testing Status: We developed this untested recipe proposal using standard culinary ratios and USDA food-safety parameters.While derived from established pastry and sauce techniques, readers should monitor browning and carryover cooking to suit individual oven setups.
Complete Recipe Card
A traditional double-crust savory pie loaded with poached chicken, aromatic vegetables, and a velvety homemade poultry gravy.
- Yield: 1 deep-dish 9-inch pie (approximately 6 to 8 cups total filling volume by capacity)
- Serving Basis: 6 generous servings (approximately 1 wedge per serving)
- Prep Time: 35 minutes
- Cook Time: 50 minutes (15 minutes stovetop filling, 35 minutes baking)
- Inactive / Cooling Time: 45 minutes (chilling pastry if homemade + 15 minutes post-bake cooling)
- Total Elapsed Time: 1 hour 30 minutes (using prepared chilled crusts)
- Essential Equipment: 9-inch standard or deep-dish pie pan (glass, ceramic, or metal; minimum 1.5-inch depth), large Dutch oven or sauté pan (10- to 12-inch diameter), rolling pin, pastry brush, rimmed baking sheet.
Ingredients
Pastry Component:
- Double-crust pastry dough: 2 standard 9-inch rolled sheets (approx. 14 to 15 oz / 400 g total), chilled (homemade pie dough or store-bought refrigerated rolled crusts)
- Egg wash: 1 large egg, beaten thoroughly with 1 tablespoon (15 ml) cool water
Filling Component:
- Unsalted butter: 4 tablespoons (2 oz / 56 g)
- Yellow onion: 1 medium (approx. 6 oz / 170 g), finely diced (about 1 cup)
- Carrots: 2 medium (approx. 5 oz / 140 g), peeled and cut into 1/4-inch rounds (about 1 cup)
- Celery: 2 stalks (approx. 3.5 oz / 100 g), sliced 1/4-inch thick (about 3/4 cup)
- Garlic: 2 cloves, minced (approx. 2 teaspoons)
- All-purpose flour: 1/3 cup (1.5 oz / 42 g)
- Low-sodium chicken broth: 2 cups (16 fl oz / 480 ml), room temperature or warm
- Heavy cream: 1/2 cup (4 fl oz / 120 ml), room temperature
- Cooked chicken breast or thighs: 3 cups (approx. 14 oz / 400 g), cut into 1/2-inch bite-sized cubes (cooked to a verified safe minimum of 165°F / 74°C)
- Frozen green peas: 1 cup (approx. 4.5 oz / 130 g), unthawed
- Fresh thyme leaves: 1 tablespoon, finely chopped (or 1 teaspoon dried thyme)
- Fresh flat-leaf parsley: 2 tablespoons, finely chopped
- Fine sea salt: 1 teaspoon (adjust to taste only if using standard salted broth)
- Ground black pepper: 1/2 teaspoon
Step by Step Guide
1: Prep & Filling
- Preheat and Prep Equipment: Position an oven rack in the lower-middle position. Place a rimmed baking sheet on the rack to preheat. Heat the oven to 400°F (204°C).
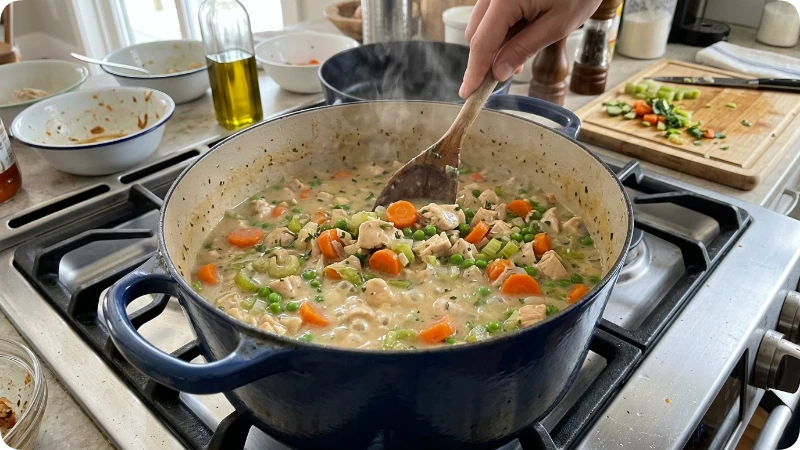
- Sauté the Aromatics: Melt the unsalted butter in a large Dutch oven or deep skillet over medium heat. Add the diced onion, carrots, and celery. Cook, stirring occasionally, until the onions turn translucent and the carrots begin to soften slightly, about 6 to 8 minutes. Add the minced garlic and cook until fragrant, approximately 45 to 60 seconds.
- Build the Roux: Sprinkle the flour evenly over the sautéed vegetables. Stir continuously for 1 to 2 minutes to coat the vegetables and eliminate the raw starch taste; do not let the flour scorch.
- Thicken the Sauce: Slowly pour in the chicken broth in a steady stream, whisking or stirring briskly to prevent lumps from forming. Stir in the heavy cream, fine sea salt, black pepper, and chopped fresh thyme. Bring the liquid to a gentle simmer over medium heat. Cook, stirring frequently, until the sauce thickens enough to heavily coat the back of a spoon, about 3 to 4 minutes.
- Fold in Chicken and Peas: Remove the pan from the heat. Stir in the cubed cooked chicken, unthawed frozen peas, and fresh parsley. Let the filling cool for 10 to 15 minutes before assembling so its steam does not melt the bottom pastry crust.
2: Pie Assembly
- Line the Pie Dish: Unroll one sheet of chilled pastry dough and gently press it into the bottom and sides of your 9-inch pie dish, leaving about 1/2 inch of excess overhang. Pour the warm chicken filling into the pastry-lined dish, smoothing the top into an even layer.
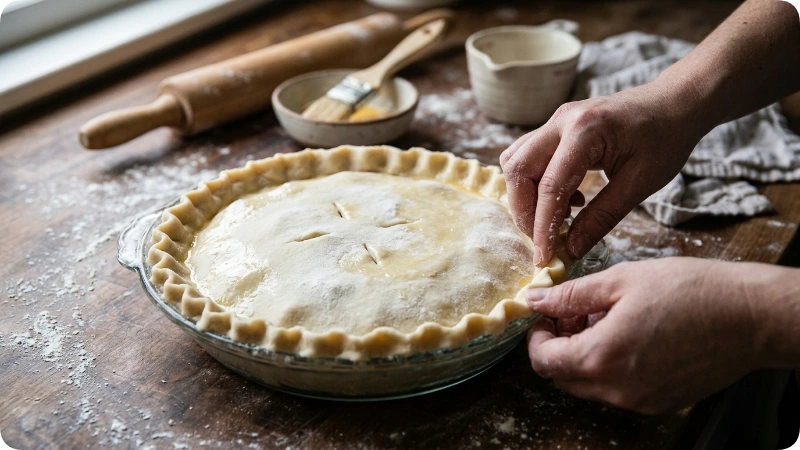
- Top and Seal the Crust: Drape the second sheet of pastry dough over the filling. Trim excess dough from both crusts to leave a 1/2-inch border. Fold the top crust under the bottom crust edge, then crimp or flute the edges together with your fingers or a fork to create a tight seal.
- Vent and Glaze: Brush the entire top surface and edges lightly with the egg wash. Using a sharp knife, cut 4 to 5 slits (about 1 inch long) in the center of the top crust to allow steam to escape during baking.
3: Baking & Resting
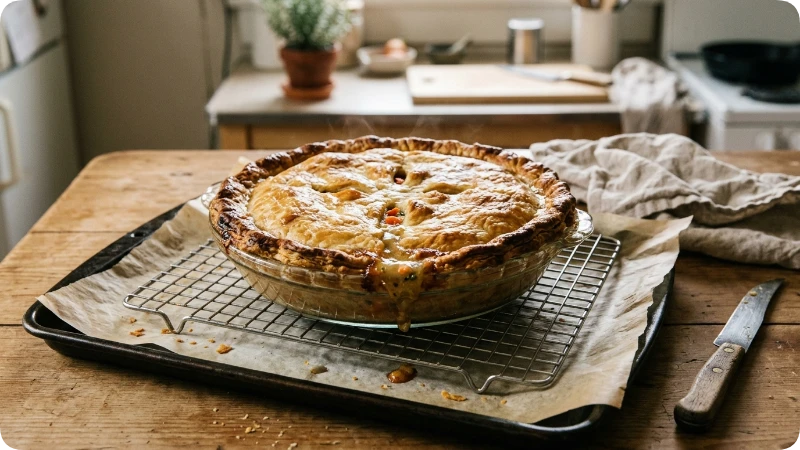
- Bake: Set the pie dish directly onto the preheated rimmed baking sheet in the oven. Bake at 400°F (204°C) for 30 to 35 minutes, until the crust is deep golden brown and the filling is visibly bubbling through the center vents. (If the fluted edges brown too quickly around the 20-minute mark, protect them with a pie shield or strips of aluminum foil.)
- Cool and Serve: Transfer the pie to a wire rack. Cool for 15 minutes before slicing. This resting window allows the starch matrix in the hot velouté to set slightly, keeping the filling from running excessively when cut.
Ingredient Notes and Substitutions
- Pastry Dough: All-butter pastry provides superior flakiness and flavor, but standard shortening-based or commercial rolled crusts yield a more structurally forgiving edge that resists shrinkage. Ensure dough is thoroughly chilled (around 40°F / 4°C) before rolling.
- Chicken Broth: Low-sodium broth is specified so you can accurately control the salt content. If using standard regular-sodium broth or bouillon cubes, decrease the added fine sea salt to 1/2 teaspoon to avoid an overly salty filling.
- Cooked Chicken: Roasted or poached boneless skinless chicken breasts provide clean, firm cubes; cooked chicken thighs add richer flavor and higher moisture retention. Store-bought rotisserie chicken meat works well; remove the skin and shred or dice the meat into uniform 1/2-inch cubes.
- Dairy: Heavy cream produces a smooth, stable sauce. Half-and-half or whole milk can be substituted at a 1:1 ratio, but the sauce will be slightly thinner. If substituting lower-fat milk, increase the all-purpose flour by 1 tablespoon to ensure proper thickening.
Before You Begin
- Pre-Cooking the Chicken: If starting from raw chicken, poach 1 pound (450 g) of boneless chicken breast in simmering water or broth until it registers a verified internal temperature of 165°F (74°C) on an instant-read digital thermometer (about 12 to 14 minutes). Cool completely, then dice.
- Pastry Temperature Management: If using refrigerated store-bought dough, allow it to stand at room temperature for 10 to 15 minutes before unrolling to avoid cracking along the folds. If using homemade butter crust, keep it wrapped in the refrigerator until the filling is off the heat.
- Preheated Sheet Pan: Placing the pie dish on a hot baking sheet accomplishes two goals: it catches accidental bubbled-over sauce and transmits direct bottom heat to help par-cook the lower crust, avoiding a soggy base.
How to Make It: Critical Stages
- Cooking Out the Flour: Once the flour is stirred into the buttery vegetables, heat it for a full minute or two until it smells nutty rather than pasty. This cooks out raw wheat starch while coating the vegetable surface area, guaranteeing smooth incorporation once liquid is introduced.
- Managing Steam Before Capping: Pouring boiling-hot filling directly under raw pastry immediately melts the fat layers in the top crust, resulting in a dense, leaden lid instead of crisp, separated flakes. Giving the filling a brief 10- to 15-minute cool-down avoids premature butter melt.
- Venting Properly: Do not skip cutting vents in the top crust. As the broth-and-cream sauce simmers inside the enclosed shell, liquid turns to steam. Without release vents, steam will force its way out through the perimeter seal, tearing your crimped edges apart and spilling filling onto the sheet.
Tips and Troubleshooting
- Problem: The bottom crust is pale and soggy.
- Cause: Trapped moisture, cold baking surface, or underbaking.
- Prevention: Bake on a preheated baking sheet set on the lowest or lower-middle oven rack. Avoid ceramic dishes with exceptionally thick bases unless you increase bottom bake time.
- Fix: Cannot be fixed once cooled and sliced. Return the whole pie to a 375°F (190°C) oven on the bottom rack for an additional 8 to 10 minutes if underdoneness is spotted before cutting.
- Problem: The filling spills out as thin soup when sliced.
- Cause: Pie was cut while boiling hot, or the sauce roux was undercooked.
- Prevention: Allow the pie to rest undisturbed for 15 to 20 minutes before cutting; flour-thickened gravies firm up significantly as their temperature drops from 200°F (93°C) down to serving temperature (145°F–155°F / 63°C–68°C).
- Fix: Allow wedges to cool on the plate; spoon remaining pan juices over individual servings.
- Problem: The crimped edges burn before the center bakes.
- Cause: Thin perimeter dough exposed to radiant heat.
- Prevention: Tent the edges loosely with aluminum foil collar strips or a silicone pie ring after 20 minutes of baking.
Variations and Alternative Methods
- Single-Crust / Skillet Pot Pie: If you prefer less pastry, prepare the filling directly in a 10-inch cast-iron or oven-safe skillet. Omit the bottom crust entirely. Roll out a single sheet of pastry, drape it directly over the filling in the skillet, cut vents, brush with egg wash, and bake at 400°F (204°C) for 25 to 30 minutes until bubbling and browned.
- Individual Ramekins: Divide the warm filling among four to six 8-ounce oven-safe ramekins. Cut rounds of top crust slightly larger than the ramekin diameter, crimp to the rims, vent, and bake on a sheet pan for 20 to 22 minutes at 400°F (204°C).
Serving Suggestions
Serve chicken pot pie warm as a standalone main course. It pairs well with crisp, acidic sides that cut through the richness of the velouté gravy:
- A simple mixed green salad dressed with lemon vinaigrette or apple cider dressing.
- Steamed or roasted green beans seasoned with cracked black pepper.
- Pickled red onions or pickled cucumbers served alongside to balance the buttery crust.
Make-Ahead, Storage, Freezing, and Reheating
- Make-Ahead (Assembled Unbaked): You can assemble the pie fully, cover tightly with plastic wrap, and refrigerate for up to 24 hours before baking. Add 5 to 10 minutes to the total baking time since you are starting from a cold state.
- Refrigerator Storage: Store cooled leftover pie tightly wrapped or sealed in airtight containers at or below 40°F (4°C) for up to 3 to 4 days (per USDA guidelines for cooked poultry).
- Freezing (Baked vs. Unbaked):
- Unbaked: Freeze the assembled pie uncovered on a flat pan until frozen solid (about 3 hours), then wrap securely in plastic wrap and aluminum foil for up to 2 months. Bake directly from frozen at 375°F (190°C) for 60 to 75 minutes, tenting with foil if edges brown early.
- Baked: Freeze completely cooled pie portions wrapped tightly for up to 2 months. Note that dairy-thickened sauces and pie crusts may lose some structural crispness upon thawing.
- Reheating: Reheat slices in an oven or toaster oven at 350°F (175°C) for 15 to 20 minutes to re-crisp the pastry. Microwave reheating is safe (heating until an internal temperature of 165°F / 74°C is reached), but the crust will become soft and doughy.
FAQs
Can I use raw chicken directly in the pot pie?
It is not recommended for this double-crust formula. Raw chicken releases significant moisture as its proteins contract, which waters down the sauce and creates a soupy base. Additionally, the 30- to 35-minute baking window is calibrated for heating an already-cooked filling; starting with raw poultry risks undercooking or uneven heat distribution.
How do I know when the pie is completely done?
Look for two clear physical signs: the pastry must be a uniform, deep golden brown across both the center and the crimped rim, and the thickened gravy must be visibly bubbling up through the center steam vents.
Can I make this filling dairy-free?
Yes. Replace the butter with an equal volume of neutral oil or plant-based baking stick, and replace the heavy cream with an unsweetened, unflavored non-dairy creamer or additional chicken broth whisked with 1 extra tablespoon of all-purpose flour.
Why did my pastry shrink down the sides of the pan?
Pastry shrinkage occurs when the dough’s gluten network is overdeveloped, or when the dough is stretched to fit the dish rather than gently lifted and settled into the corners. Chilling the dough before baking relaxes the gluten fibers and reduces shrinkage.
Summary
This guide provides a comprehensive, chef-structured method for preparing a traditional double-crust chicken pot pie from scratch. The core technique centers on building a chicken veloute, a roux-based sauce combining butter, flour, low-sodium chicken broth, and heavy cream cooked alongside aromatics like onions, carrots, and celery.
Pre-cooked chicken cubes and frozen peas are folded into this rich sauce before the filling is transferred to a pastry-lined pie dish. To ensure crispness and avoid the common pitfall of a soggy bottom crust, the pie is baked on a preheated sheet pan positioned on the lower-middle rack of an oven heated to 400°F (204°C).
The article details crucial timing markers, emphasizing that the filling must rest for 15 minutes after baking so the starch matrix stabilizes for neat, clean slicing. Comprehensive make-ahead, freezer, and safe reheating instructions are included to support efficient weeknight meal planning.

Leo Campbell is the founder, recipe developer, and culinary voice behind Recipe Morsil. With nearly a decade of hands-on home cooking and professional baking experience, Leo tests every recipe multiple times to ensure reliable, fail-proof results in real home kitchens. When he’s not fine-tuning spices or testing cook times, he’s helping home cooks build confidence one bite at a time.
Connect with Leo via [Instagram/Email] or explore his verified recipes below.